Sunday, September 29, 2013

Harvesting Garden Herbs For The Winter

 
Fall Harvest
 
I've been busy getting my house ready for Fall. 


A few weekends ago I cut down the potted herbs on my deck and began the process of prepping them for freezing. 
 
I had a beautiful assortment of herbs this summer along with my tomato, jalapeno pepper and lavender plants.  Instead of flowers on my deck I grew tarragon, sage, lemon sage, rosemary, mint, apple mint, oregano, basil, dill, chives,  cilantro, parsley and hot and spicy oregano. The only good thing about the rain this summer was I rarely had to water. 
 
After the herbs were cut and the best leaves were selected, I soaked them in separate bowls.  Then I washed and washed until not a particle of dirt was left.  I individually washed some of the larger leaves like the sage. 


I always keep some large towels in my laundry room.  They come in handy for lots of kitchen chores.  I spread out all the herbs to dry.  Every now and then throughout the day I moved and turned them so they dried evenly.


When the herbs were completely dry I put them in bundles on the counter.  I mixed a few together like the mint, oregano, sage, etc. because I combined them in recipes all summer.  The flavors compliment each other. 


Lastly the herbs were packaged in freezer bags and labeled making sure to let the air out of the bags before sealing. The jalapeno peppers were washed, dried and placed in the bags whole. 


Last week I picked some of the last tomatoes from my pots.  We used the frozen cilantro and jalapeno peppers for salsa and it was really good.  Over the winter when it gets too cold to grill, I'll use the rosemary, sage and tarragon to season pork tenderloin which is stuffed with apples and onions. The recipe is coming soon!  Instead of butter, I use chives with sour cream for sweet potatoes .  Parsley goes so fast I can never keep enough of it in my freezer.  These herbs won't last through the winter but I love having them in my house when I need them instead of forgetting to buy them!


Tuesday, September 17, 2013

Fanciful Felted Bag with Instructions

Felted Bag with Instructions
 
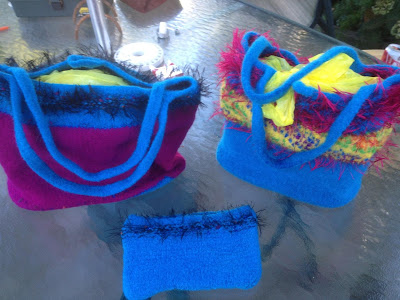
Sue, the founder of our quilt group is a master at knitting and crocheting.  She surprised me and texted these photos plus the pattern.  She said this bag is really easy and fast to knit.  If you make one please share - I would love to post the photos!!


Fanciful Felted Bag with Novelty Top

Size 11 circular needles

3 skeins (140 yds) wool for small bag

Novelty yarn for top

Small Bag (Medium, Large)


Cast on 34 (38,42) stitches on circular needles. Knit back and forth in garter stitch for 34 (38,42) rows.


Pick up and knit 16 (18,20) stitches along the first edge of the rectangle. There are 17 (19,21) ridges, so you just pick up one stitch between each ridge.
 

Pick up and knit 34 (38,42) stitches along the bottom of the rectangle.


Pick up 16 (18,20) stitches along the last edge just like you did for the first edge.


You will now have 100 (112,124) stitches. Place a marker and begin to knit in the round.


Knit for 50 (55,60) rows. On last row decrease as follows: knit 2 together, knit 10 * repeat to end of round.


Add novelty yarns to main yarn. (You are knitting with both the wool and novelty yarns together. I use 1-4 different novelty yarns depending on the fullness and look I want) Purl for approx. 10 rounds. This should measure about

2-3 inches as preferred.


Cut novelty yarn and with main wool yarn Knit 1 round, Purl 1 round, Knit 1 round, Purl 1 round. Bind off all stitches.
 

Handles


Cast on 7 stitches

Knit 4, yarn in front, slip next 3 stitches as to purl, turn

Repeat until handles measure 26 inches.

(I made a smaller piece using 3 stitches approx. 4 inches long for a button closure)

Sew handles and button closure to bag.


Felting


Place the bag in a mesh bag or zippered pillowcase. Set washing machine to hot wash, small load setting and add 1 tablespoon of Eucalan No Rinse Fabric Wash. Add a few pairs of old jeans and the bag. Wash on high agitation cycle.  Stop the cycle every 5 minutes and check the bag for size. When you can’t see the stitches anymore, it is usually done. You can always felt more if the size doesn’t seem right. There is no need to rinse the bag. Remove it and press out as much water as possible from the bag.


Block the Bag

Find a box the same size as the bag (it can be taller and stick out of the top) and place the box in a plastic grocery bag. Put the plastic covered box into the felted bag. Allow the bag, bottom side up, to dry completely (1-2 days). Blocking the bag creates a flat bottom so the bag will sit flat.

 
Good Luck!  If you have any questions, please use the "comment" box and we will supply the answers for you - hopefully! 
 
Thanks again Sue!


Sunday, September 1, 2013

Goodbye Summer '13!

 
Summer 2013 - not a lot of words needed...


A good beach day was when you had sand in your toes and a sunburned nose...