Sunday, October 25, 2015

October 2015

October 2015

Fall is my favorite time of the year.  So far this Fall has been beautiful.  Our marigolds stayed robust until this past week when the nights started to get really cold.


So once again everything summer disappeared.  All the shells found their way back into their different bags and out came the Fall/Halloween/Thanksgiving STUFF.  With Susan's help getting everything out wasn't as painful as it's been in the past.


A little Caramel Apple Sangria helped make the process a little easier.  My friend Sue at work came in one day and told us about this recipe.  I looked it up and made it and it's a keeper.  She had it in a restaurant with cinnamon and sugar around the rim of the glass.  It's to die for and tastes so good on a crisp evening.

Caramel Apple Sangria

ARAMEL APPLE SANGRIA RECIPE
PREP TIME
TOTAL TIME
Author: 
Recipe type: Cocktail
Serves: 10 - 11
INGREDIENTS
  • 1 750 ml bottle of pinot grigio (or your favorite mild white wine)
  • 1 cup caramel flavored vodka
  • 6 cups apple cider
  • 2 medium apples, cored and chopped
INSTRUCTIONS
  1. Stir the wine, vodka, and apple cider together in a large pitcher.
  2. Add the chopped apples to the pitcher, or to individual glasses.
  3. Serve the sangria over ice.
NOTES
Apple cider settles. If the sangria sits for a while, it will need to be stirred before serving.

*  *  *  *
Back in late September Chris and I were in Boston for a long weekend and decided to take a day trip up to through the Merrimack Valley region of New Hampshire.  We originally planned to drive the "antique route" but that didn't work out because we didn't see any antique shops anywhere along route 4.  That was fine because I had researched a few places up that way in Barrington that looked really fun to visit.  

On Calef Highway I saw a sign for a quilt shop called The Fabric Garden.  It was really tiny and in a woman's basement.  It's worth a stop because she had a few interesting Christmas panels.  I asked her where we could stop for lunch and she recommended Frank Jones.

This is a funky little family owned restaurant.  It was a beautiful hot day and we sat outside on the deck and had a fabulous lobster roll and cold beer.  


On to one of the main attractions Calef's Country Store which is right on Calef Highway right up the street from Frank Jones.

 This old country house reminded me a lot of the Vermont Country Store we visited in August.  


This store has all kinds of good food. There's a little deli in the rear of the store and a small restaurant section where you can eat.  The old fashion candy section was soooo wonderful we bought a few goodies.


I could spend every day in stores like this.  Luckily for my wallet and weight I'm not close enough to visit often.


Now for the most adorable store I've ever been in!  This is the Elfmade Home Decor Company.  I could live in this store.  


Room after room of the most adorable treasures.


I had to go through it twice just to see most of everything displayed.


All kinds of potpourri are out and bagged.  I brought home a bag of pumpkin and a bag cranberry.  My house smells so amazing.  I also bought the oils to keep the potpourri fresh smelling.


Katrina at the quilt shop told us not to miss The Christmas Dove which is diagonally across the street.  

We were the only ones in this huge shop full of every kind of Christmas item you can think of.  


There are lots of Downton Abbey ornaments and windows full of Dicken's Village.


OK not yet!  Back to Halloween and Thanksgiving!


Just as Chris thought he was going to head home we had one more quilt shop to visit.  Katrina at the Flower Garden told me Camille over at Evergreen Country Primitives Quilt Shop had the most wonderful shop.  Camille's shop used to be in the same area as Calef and Elfmade but she couldn't afford the rent so she moved her shop to her basement in Milton.  We got sketchy directions from Katrina so we had a little hard time finding it because it wasn't well marked.  But after driving up and down her street a few times we did manage to find her driveway.  While I was inside visiting with Camille and buying a few things she told Chris to sit in one of the big "man" chairs outside and enjoy the peace of her beautiful quiet backyard.  When I was done visiting with Camille I went outside to find Chris having the snooze of his life in that chair.  I felt  terrible waking him up but it was getting time to head back and get ready to go out to dinner.  This is a finished prim kit I bought from Camille.  She even had the frame to go with it.


I loved spending the day in that part of New Hampshire.  It's about an hour away from the MA border and so worth the trip.  I really want to go back around Christmas time.  I'm sure it's beautiful there and the shops must be well decorated. 

*  *  *  *

Last weekend Kristen was home and made these pumpkin cake bars.  They were delicious.  I've never gone wrong with a King Arthur recipe.  The directions are easy to follow and the left-overs freeze great.


King Arthur's

pumpkin cake bars with cream cheese frosting

star rating(48)rate this recipe »
Hands-on time:
Baking time:
Total time:
Yield:4 dozen 2" squares, or 3 dozen 2" x 3" bars


These cake-type bars are moist and delicious, similar to carrot cake but with a fall flavor. The rich cream cheese frosting will also remind you of carrot cake — which isn't a bad thing! Do toast the walnuts before using them; toasting brings out their nutty essence.


ingredients

cake

  • 1 cup vegetable oil
  • 1 cup brown sugar
  • 1/2 cup granulated sugar
  • 4 large eggs
  • 1 cup pumpkin purée
  • 1 teaspoon baking soda
  • 1 teaspoon baking powder
  • 1/2 teaspoon salt
  • 1 tablespoon pumpkin pie spice, or 1 1/2 teaspoons cinnamon and 1/2 teaspoon each ginger, nutmeg, and cloves
  • 2 cups King Arthur Unbleached All-Purpose Flour
  • 1/2 cup toasted chopped walnuts
  • 1 cup golden raisins, or 1/2 cup golden raisins and 1/2 cup ginger mini-chips

frosting

  • 8 ounces cream cheese, softened
  • 1/4 cup (4 tablespoons) unsalted butter, softened
  • 2 tablespoons maple syrup
  • 2 1/2 cups confectioners' sugar, sifted
  • 1/8 teaspoon salt
  • 1 cup toasted walnut pieces

tips from our bakers

  • To toast nuts, place them in a single layer on a baking sheet and bake in a 350°F oven for 8 to 10 minutes, just until you can start to smell them; let cool before using.
  • Want to make this recipe in a 9" x 13" pan? Change the amounts of ingredients as follows: 2/3 cup vegetable oil, 2/3 cup brown sugar, 1/3 cup granulated sugar, 3 large eggs, 2/3 cup pumpkin purée, 3/4 teaspoon baking soda, 3/4 teaspoon baking powder, 3/8 teaspoon salt, 2 teaspoons pumpkin pie spice, 1 1/3 cups King Arthur Unbleached All-Purpose Flour, 1/3 cup chopped toasted walnuts, 2/3 cup golden raisins/ginger mini chips. Bake as directed in the original recipe. For the frosting, reduce ingredients as follows: 4 ounces cream cheese, 2 tablespoons softened butter, 1 tablespoon maple syrup, 1 1/4 cups confectioners' sugar, pinch of salt, 1/2 cup diced toasted walnuts.
*  *  *  *

Back to Fall and Halloween!!  I hope you enjoyed our visit.  I did! 

See you soon!!


Monday, September 21, 2015

September 2015


IS IT FALL YET?  


It looks like Summer is still holding on a little but not for long.  I kept this part of our summer vacation for my September blog because this is the perfect weekend getaway if you're heading north to see the foliage.  In August, after we left Quebec we stopped in VT for a night.  There are so many neat places to visit in VT it was impossible to do everything on our list of sites to see but we managed to cram a lot into a very short time.  We were surprised that Quebec had so many maple syrup products and that carried right down into Vermont.  When we got across the border we came to a little town called Derby.  This is one of those quaint picturesque towns you can only find in New England.  Imagine a town green with a bandstand and American Flag banners.  Everyone was so friendly.  We stopped and asked someone where to find the best maple products and he didn't disappoint.  If you are ever up that way you have to stop at Jed's.  It has just about everything maple including their own homemade everyday soft-serve maple ice cream.  We had some and if they put walnuts in it I don't think they ever could have gotten me out of there!


This little place is on a side street set in the wilderness surrounded by flowers and trees.  It was so serene and beautiful.  Everyone should know nature like that everyday.


I have wanted to visit the King Arthur store for as long as I've been married.  My mom introduced me to King Arthur flour and I've never used anything else. This is a must see and return kind of place.  


We arrived early and had breakfast.  It was the most delicious homemade food we've ever had. And I had a cappuchino that puts Starbucks to shame.  I wish we could have stayed for lunch but we just didn't have time.      


I had to wait for all of the little kids to leave these cut-outs to take a photo.  I only did it for blog purposes but it was kind of a good feeling to get out of my comfort zone for a minute and do something silly!


There are no words to describe this store.  I can only say I was in awe.  


And I bought A LOT!


I bought some yeast and pizza flour which I put in my freezer.  In the winter if everyone's home and there's going to be a snow storm I like to make pizza.  We make sure we have enough beer on ice and mugs in the freezer.  We put on music and get the wooden paddle and pizza accessories out and make all kinds of pizzas all night long.  


Ain't it the truth!


Next on the list was the Vermont Country Store.  I used to get their catalog in the mail but I never thought the store was as big and beautiful as it is.  I wouldn't hesitate to order anything for there now.  They sell really fine quality goods.


The weather was fabulous and it was really crowded in the store but the cashier said that was nothing compared to the Fall.  Starting in September the lines are out the door.


Yes, if you can't tell by now this was yet another eating vacation.  You could eat for a month in this store.  They have samples of everything out so you can taste them.  And of course we did and the more we tasted the more we bought!


They have rooms and rooms full of the most wonderful things.  Years ago I wanted a red checked woven tablecloth from there but it was too expensive.  I saw the very one upstairs with all the kitchenware, linens, quilts etc.  It was still too expensive to justify in front of Chris so all I could say was REMEMBER THIS FOR CHRISTMAS!  I don't think he heard me because he's never heard that phrase in the 26 years I've been saying it.


I hate coming home after vacation.  Wherever I am I always say "I could stay here and never go home."  And while I'm away I really mean it!

Back to reality.  I wanted to share how proud I am of actually making something that turned out to look the way it's supposed to!  It's so rare! I'm really proud of this little quilt.  I will share more of my little  book of little quilts because it has adorable projects.


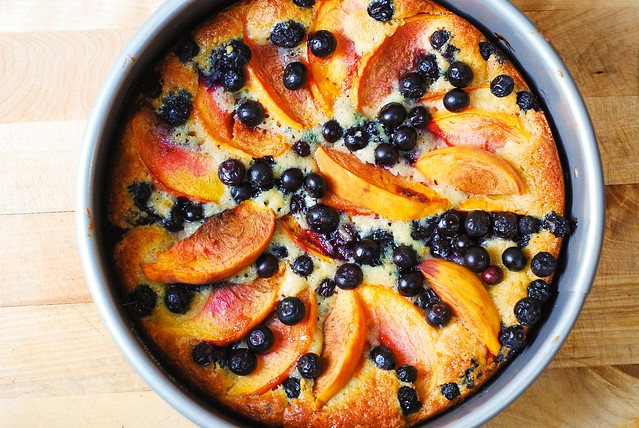
Never ever would I leave a post without some type of recipe to share!  This cake was the highlight of the summer.  It was so easy, fabulous and again looked and tasted picture perfect! I promised everyone I would make it over and over with every fruit that came my way.  Sadly, time and my waistline are my enemy so I haven't been able to make it again BUT I will! Those prune plums up top are calling my name and they're telling me to make this cake with them.  Stay tuned!


Peach and Blueberry Greek Yogurt Cake
  
Prep Time: 20 minutes
Cook Time: 1 minute
Total Time: 1 hour, 20 minutes
Yield: 1 cake, using 9x3-inch springform pan
Peach and Blueberry Greek Yogurt Cake
Ingredients
  • Follow Julia on Pinterest and Facebook to get more recipes for your weekly meal planning!
  • 1 and 1/2 cups all-purpose flour
  • 1 teaspoon baking powder
  • 1/2 teaspoon baking soda
  • 1/2 stick butter, softened
  • 1 cup sugar
  • 2 eggs
  • 1/2 teaspoon vanilla
  • 1/2 cup Greek yogurt
  • 2 peaches, sliced into wedges
  • 6 oz blueberries
  • 1 teaspoon granulated sugar
  1. Preheat oven to 350°F with rack in middle. Grease the side and the bottom of the pan with butter or cooking spray. Line the bottom of a 9x3-inch springform pan (or 9 inch round cake pan) with parchment paper. Grease the parchment paper too.
  2. Sift flour, baking powder, baking soda, together into a medium bowl.
  3. In a separate bowl, beat butter, sugar, and 2 eggs until very light in color and fluffy, 2-3 minutes on high speed. Add vanilla and Greek yogurt and continue beating until very creamy and light in color, for about 1 more minute.
  4. Keeping the mixer speed low, mix in the flour mix until combined. Do not overmix.
  5. Transfer the cake batter to the springform pan. Top with sliced peaches, and scatter blueberries evenly on top in the spaces between the peach slices. Sprinkle the fruit with 1 teaspoon granulated sugar.
  6. Bake until cake turns golden, and the tester comes out clean in the center, about 1 hour, depending on your oven. Midway through baking, I like to put some extra peach slices and extra blueberries on top of the cake for prettiness, and return cake to baking.
  7. When the cake is done baking, let it cool (still in the baking pan) on a wire rack. After cake has cooled for about 40 minutes, release the cake from the springform pan. At this point, if the cake is cool enough, you can slide your hand under the cake, between the parchment paper and the bottom portion of the springform pan and move the cake with the parchment paper attached to its bottom onto a cake plate easily.

Finally, in Derby VT we drove past a prim shop.  And we turned around and went back and actually went inside.  It's called Primitive Place.  It's in an old white house and when you walk in you're transported back to the long lost place we all dream of.  I love everything primitive so I did buy some wonderful things.  I couldn't resist this house.  All I could picture when I was looking at it is how I'm going to love to see it lit up when the snow is falling outside my window.


And I fell in love with this pillow.  So I brought it home and it sits on my bed and when I go to sleep at night...


I will dream this...


Thanks for visiting and see you in October!!!


Tuesday, August 25, 2015

August 2015

This is the time of year when a little rain now and then makes all of the plants and flowers blossom as if they lived in a tropical climate.  It's hard to believe in a few months this landscape will look entirely different.


Our summer vacation this year was Montreal, Quebec and Vermont.  We put off this trip for years.  Chris decided to go up through Vermont to Montreal.  We found no traffic at all on the way up.  We stopped and took a break to have lunch in St. Albans, VT which is close to the border.  This is a great little cafe in the center of town. 


This is the view approaching Montreal.


The first day we looked around the city and then got busy going to see all the sites.  One of them was a stop at the Montreal Museum of Fine Arts.  I LOVE monkeys so this is one of my favorite exhibits.


Notre Dame


Typical photo of the streets of Montreal.


The food was delicious.  The servers in Canada are professional, well paid and it's their career so we experienced fantastic service all the way through.  The shopping is great.  We could have spent a lot more than a day at the underground mall.  We hit the jackpot on all counts except the calories!


Entering the gate leading to the Old City.


Le Chateau Frontenac is one of the most beautiful hotels I've ever seen.  Inside is just as gorgeous!


A ride down the Funiculaire to the old city.


This part of Quebec was crazy busy but the rest of the city was surprisingly quiet.  I guess every tourist who comes here is here.


Beautiful art and architecture abound all the way through.


The views are breathtaking.


The French Canadian people we met were wonderful.  Both Chris and I took French in high school.  We prepped for our trip to France years ago and thought we would be rusty for this trip but we did just fine.  All you have to do is greet everyone in French and try a little and they will automatically go with your cue and speak to you in the language you prefer.  They even treat their cats well!


We came home to an abundance of fresh native tomatoes and peaches.  I love this time of year but unfortunately it's way too short.  As soon as the first frost comes it's all over and those hothouse tomatoes in the store are nothing compared to home grown.


My mom used to make squash flower patties.  I never tried to make them but I came across these flowers a few weeks ago and decided to give it a try.  I was never interested in cooking when I lived home but I was always in and out of the kitchen when my mom was cooking.  Somehow through osmosis I remembered this recipe.


My mom was a really good cook.  However, she didn't follow intricate recipes.  She made everything from scratch and used native fruits and veggies when she could.  She would be called a "purist" today.  My style of cooking is very much the same.  There is no recipe for these patties but you really can't go wrong.  Wash and drain the blossoms a few times in cold water and then cut them into small pieces.  In a bowl, add 1 to 2 eggs depending on how may flowers you have.  Add grated cheese, fresh chopped parsley, salt, pepper and flour.  Stir everything.  The key to judging if the batter is ready for frying is if the consistency is like thick pancake batter.  I never fry anything but I have grapeseed oil on hand just in case.  This oil is very light and doesn't burn food.  Let the patties get nice and brown on one side and then flip them and do the same on the other.  When you take them out of the pan put them on a paper towel to get the excess oil off.  They're wonderful the next day too.  If my mom had left over cooked cauliflower or asparagus she made these patties and Chris' father made these patties with canned corn.  I'm sure there are a lot more variations.  Nothing beats these in the summer with a glass of cold white wine.


We always have fresh strawberries in the fridge and some of them were getting over ripe so I asked Kristen to bake something using them.  She found this recipe and again it's a keeper.  On a hot night sitting outside these tasted amazing.  If Labor Day is as hot as the past few weeks this will be our dessert!

Strawberry Lemonade Bars

by averiecooks.com

Strawberry Lemonade Bars - Imagine crossing lemon bars with a strawberry pie. These easy bars taste like strawberry lemonade! Sooo good!
There’s a creamy, sweet, lemony filling that tops the crust, which gives the bars a soft 

Bars that taste like strawberry lemonade are even better than drinking it. The bars are what you'd get if you crossed a crumble-topped strawberry pie with a lemon bar. They're sweet from the strawberries with some tart lemon flavor that peeks through. They're soft, juicy, satisfying, and the crust mixture does double duty as the crumble topping. There’s a creamy, sweet, lemony filling that tops the crust, which gives the bars a soft but dense texture. The strawberries soften and release their juices while baking and help the bars stay moist. I used a combination of fresh and frozen strawberries and added flour to the strawberry layer. You may not if you’re baking exclusively with fresh berries. Baking time will vary based on if your berries are fresh, frozen, and how juicy they are. Between the firm crust, soft filling, juicy strawberries, fragrant lemon zest, and sandy crumbles, there are so many wonderful textures and flavors in every bite.

YIELD: one 8x8 pan, 9 to 12 generous squares

PREP TIME: 15 minutes

COOK TIME: about 60 to 75 minutes

TOTAL TIME: 3+ hours, for cooling and setting up

INGREDIENTS:

Crust and Crumble Topping
1/2 cup unsalted butter, melted
1/2 cup granulated sugar
1/4 cup light brown sugar, packed
1 1/2 cups all-purpose flour
pinch salt, optional and to taste
Filling
1 large egg
1/2 cup plain or vanilla Greek yogurt; or sour cream (lite is okay)
1/3 cup granulated sugar
2 tablespoons lemon juice
2 teaspoons vanilla extract
1/4 cup all-purpose flour
Strawberry Layer
2 heaping cups diced strawberries (fresh or frozen; I used a combo)
1/3 cup granulated sugar (or 1/2 cup if berries are sour)
2 tablespoons lemon juice
2 teaspoons lemon zest, or to taste
2 teaspoons cornstarch
up to 2 tablespoons all-purpose flour (if using fresh berries, you may not need any flour, and if using frozen berries you likely will need 2 tablespoons)

DIRECTIONS:

  1. Preheat oven to 350F. Line an 8-inch square pan with aluminum foil and spray with cooking spray; set aside. Lining the pan will really help with cleanup and is recommended.
  2. Crust and Crumble Topping - In a large, microwave-safe bowl melt the butter, about 1 minute on high power.
  3. Add the sugars and whisk to combine.
  4. And the flour, optional salt, and stir to combine. Mixture will be very dry and sandy with some larger, well-formed crumble pieces.
  5. Set a heaping 3/4 cup crumble mixture aside.
  6. Transfer remaining mixture to prepared pan, and using a spatula or your fingers, hard-pack the mixture to create an even, smooth, flat crust; set aside.
  7. Filling - In a medium bowl, add the egg, Greek yogurt, sugar, lemon juice, vanilla, and whisk to combine or beat with a handheld electric mixer until smooth.
  8. Add the flour and whisk to combine or beat with a handheld electric mixer until smooth.
  9. Evenly pour filling over the crust and jiggle pan to help distribute it or smooth it with a spatula; set aside.
  10. Strawberry Layer - In a separate medium bowl, add all filling ingredients except flour and toss to combine.
  11. Evaluate mixture and if it's very thin, runny, soupy, or liquidy, add up to 2 tablespoons flour to help thicken it. If using fresh berries, you may not need any flour. Because I used half fresh and half frozen berries, I needed 2 tablespoons flour because my mixture was thin and soupy.
  12. Evenly distribute strawberry mixture over the filling, smoothing it lightly with a spatula.
  13. Evenly sprinkle with the reserved heaping 3/4 cup crust mixture. Before sprinkling, I squeeze the mixture in my palm to encourage bigger crumble pieces to form.
  14. Bake for about 60 to 75 minutes (place pan on a cookie sheet for insurance against overflow if your pan is quite full), or until edges are bubbling quite vigorously and there's some bubbling in the center. Crumble topping should appear set and very pale golden. I used some frozen berries and the pan was very cold going into the oven and the strawberry layer was quite runny; I baked for 72 minutes. If using fresh berries, baking time will be reduced, likely right at the 60 minute mark, but start checking at 50 minutes. Watch your bars, not the clock, when evaluating doneness. Place pan on a wire rack and allow bars to cool for at least 2 hours (overnight is even better) before slicing and serving. After cooling overnight, I placed pan in the fridge 2 hours before slicing to ensure clean, neat cuts. If you try to slice bars before they've cooled completely, they'll be extremely messy and could fall apart. Bars will keep airtight at room temperature for up to 1 week, in the fridge for up to 10 days (they're good slightly chilled if you like chilled pie and I store them in the fridge), or in the freezer for up to 6 months.
Soon I'll be off on another adventure!  I haven't had very much time to work on hobbies this summer but I'll be back in September to share some really good things!


Thanks for visiting!  Happy Labor Day and I'll see you in September!!