
Wake up everybody! Spring is supposed to be right around the corner!

As you know by now you can tell the time of the season by the way my hutch is decorated. Last month when I told my friends I still had my winter decorations up they insisted I take them down because with the lot I have winter will never leave.

I promised my buddies at Hamden Crafters and Hamden Quilters that I would post more of their projects. They are always so willing to model and share all of their beautiful creations. What better time than Spring to show them off.

We have a great time whether the whole crew is present or less than half of us. All we need to do is get on the subject of crafts, recipes, what's going on in and around town, Downton Abbey, Doc Martin, etc. etc. and we close the place.
Our stitchers rank right up there with our quilters. Here Diane models her lovely warm crocheted vest. And the bonus is her turtleneck matched perfectly. Diane, I hope you wore this gorgeous creation out to celebrate your birthday last week!

And here is another project Diane is working on. She crocheted this bright and cheery lap blanket for the seniors. All of the members of our group love to volunteer to make the most beautiful things for our seniors and people in need.

Sandy is a fabulous quilter and knitter and she's got the biggest stash of everything we've ever seen. She made this gorgeous little knit dress for one lucky little girl! Only, after looking at the picture in the instruction book, Donna was a little peeved that Sandy didn't make the teddy bear and booties to match. That didn't rattle tough Sandy though. She said she was done with that project and when we say we're done with a project WE'RE DONE! Unless you're like me who resurrects them years later only to wish I hadn't.

This is a hat in the works by Cathi. This past Thursday I asked her about the hat and she kind of brushed that off and showed me what she was determined to finish now.

Cathi says this is the last ditch effort to finish this scarf because if she doesn't finish it now IT'S NEVER GOING TO GET FINISHED! We say that all night long.

Donna, the pal we all run to who can figure out any kind of pattern known to man, made this gorgeous tumbler runner. She's working on the binding now.

Dianna is making this beautiful quilt for her son. At group she was embroidering around the diamonds. What patience! Good luck Dianna with your hip replacement. We miss you and hope to see you real soon! Maybe while you're recovering you'll finish it!!

Now we come to Anne. She is an amazing quilter. She can take scraps of any color, put them together and make a masterpiece. The worst part about Anne is she does everything effortlessly so everything is easy for her. Don't trust her when she says that because nothing she does is easy. I tried some of her "easy" quilt blocks and they're anything but.

This past Thursday Anne shared with us these quilts she made for the organization called Quilts of Valor. They make quilts for vets. I don't know where she gets the time but thankfully there are people out there like her who volunteer their precious time to do amazing things like this.

Each quilt comes with a beautiful sewn pillowcase and label.

Jane Dougherty is the CT Coordinator for Quilts of Valor. If you or anyone you know would like to be a member of this wonderful caring group, her email address is Jane.Dougherty@QOVF.org.

All you have to do is make the top of the quilt. Jane provides the backing, label and long-arms it. When she's finished you just have to bind it. That's incredible.

Here's another one of our regular models. Claire loves to model her creations. Let's hope she'll be able to wear this fabulous patchwork jacket outside real soon.

I don't know how she had the patience to make this jack and I don't dare even ask because I wouldn't understand anything she tried to explain.

As always I have missed some projects. At group I take lots of photos of everyone's projects but I am horribly guilty of forgetting who they belong to when I start posting my blog. I am down to posting once a month because it's very time consuming and as you can tell I like everything to be perfect. As I get older I realize perfection does nothing but slow you down. Unfortunately I really can't change now. So to whomever this little gem which I love so much belongs - - forgive me for forgetting! I know I'm going to hear it next time we meet. I know someone won it somewhere but for the life of me I can't remember who or where! Donna said I should take photos of everyone after I photograph their project. In the future I may have to do that!

As for me, I'm still working on this applique wall hanging I bought in a little store in Denali, Alaska. I hope to finish it soon and hang it on the back of my front door to remind myself of the wonderful trip we took last summer. I loved all of the mountains and greenery so much not to mention where I found my love of moose!

I can't end this post without wishing everyone a Happy St. Patrick's Day this coming Tuesday. My co-worker and friend Kim walked in at the end of last week with this Irish Bread Braid that blew me away. She said she found the recipe on FB.

This is what it looks like inside! It's really a meal. It smelled to die for!! We spent a good ten minutes rattling off everything and anything you can stuff this bread with. This is next on my endless list of unbelievable things to make. I hope you're reading this blog Kristen because I'm buying the ingredients!

-You’ll want to prepare your ingredients
first. If you’re using chopped spinach from the frozen section, make sure it’s
thawed and drained completely. You’ll also want to boil the potatoes ahead of
time, too, so they have time to cool completely and you can slice them easily.
-Place the dough sheets on a baking sheet and pinch the edges together to seal
into one big rectangle. Top it with corned beef and spinach… -Then the taters…
-Then the shredded cheese. Use a knife or kitchen scissors to cut the long sides
of the dough into 1-inch strips to get it all ready for the braidin’ -Fold in
the short end, then alternately cross each strip over the filling to make a
“braid” effect. Kinda neat, right? -Once the dough is fully braided, brush on a
little egg wash and sprinkle the top with caraway seeds. YUM. -Bake the braid
until it’s a deep golden brown, the filling is warm and the cheesy is
uber-melty, about 25 minutes. Let the bread sit for a few minutes out of the
oven before slicing into it, otherwise all that magical cheese will ooze away!
-Slice the braid into strips and serve, either with some Thousand Island
dressing, Dijon mustard or on its own. If you’re lucky enough to get a slice of
this bread braid, then you’re lucky enough…
Irish Bread Braid
Ingredients
- 2 cans Pillsbury Recipe
Creations seamless dough sheet
- 6 ounces sliced corned beef
- 1 cup chopped cooked spinach
- 2 large red potatoes, boiled,
cooled and sliced
- 1 cup shredded white cheddar
cheese
- egg wash (1 egg beaten with 1
tablespoon water)
- caraway seeds, for sprinkling
(optional)
Directions
- Heat oven to 375 degrees F.
Line a baking sheet with a silicone mat or spray with cooking spray.
- Unroll dough sheets onto
prepared baking sheet. Place sheets side-by-side lengthwise and press into
one large rectangle, pinching seam together with fingers.
- Place corned beef in center of
dough in a 8-inch wide strip. Top with spinach, then potatoes. Sprinkle
with cheese.
- Using a knife or kitchen
scissors, cut 1-inch wide strips on long sides of dough (cut the same
number of strips on each side) to within a 1/2-inch of the filling. Fold
in short sides, then alternately cross strips over the filling to make a
- Brush braid with egg wash, then
sprinkle with caraway seeds, if desired. Bake 25 minutes or until a deep
golden brown; let cool 5 minutes before slicing.
Recipe
and Photo credit:tablespoon / CC
BY-NC-ND
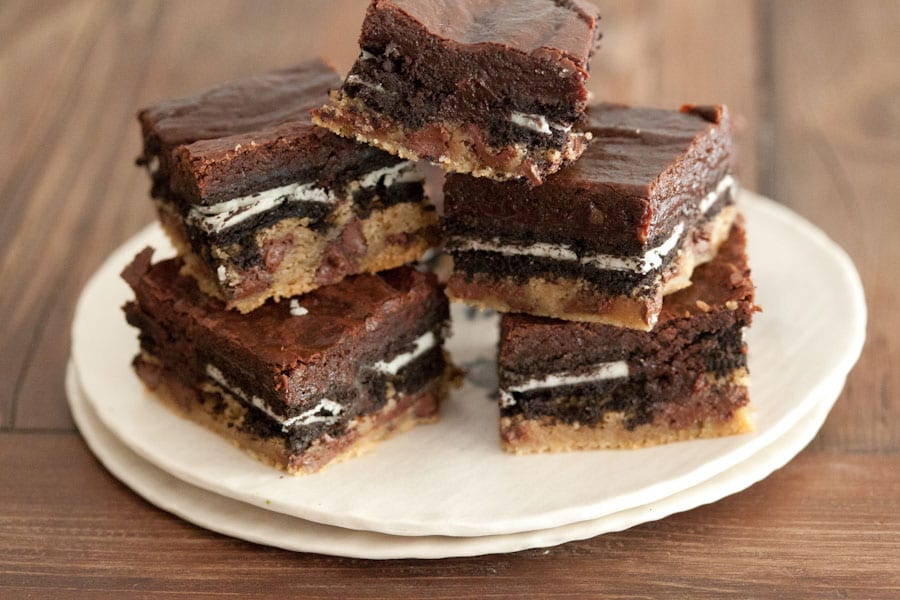
So what's a delicious meal without dessert! Kristen introduced these Slutty Brownies to us a while ago. Ever since Luke declared them his favorite they have become the whole family's favorite and we can never make enough of them . He's definitely got good taste when it comes to food because they are really really really to die for!
Slutty Brownies
Yield: 1 9x9 brownie pan
Serving Size: 16 brownies per
recipe
Ingredients
For the Brownie
layer:
·
10 tbsp unsalted butter
·
1 1/4 cups white sugar
·
3/4 cup cocoa powder
·
1/2 tsp salt
·
2 tsp vanilla extract
·
2 large eggs
·
1/2 cup AP flour
·
For the Oreo layer:
·
1 package of Oreo (regular stuffed or double stuffed)
·
For the Cookie Dough layer:
·
1/2 cup unsalted butter (at room temp)
·
1/4 cup brown sugar
·
3/4 cup white sugar
·
1 egg
·
1 1/4 tsp vanilla extract
·
1 1/4 cups AP flour
·
1/2 tsp salt
·
1/2 tsp baking soda
·
1/2 tsp baking powder
·
1 cup semi-sweet chocolate chips
·
Instructions
1. For the Brownie
layer:
2. In a medium
sauce pan, melt the butter over medium high heat. Add the sugar and cocoa
powder once the butter is melted. Whisk to combine and remove from heat. Add
the salt, vanilla and eggs and continuously whisk until the eggs are combined.
Add the flour and continue to mix. Set batter aside.
3. For the Cookie
Dough layer:
4. Cream together
the butter and sugars in a mixer. Add the eggs and vanilla, making sure to
scrape down the sides of the mixing bowl. Add the flour, salt, baking soda and
baking powder and mix on low until everything is incorporated. Fold in the
chocolate chips. Set dough aside.
5. Assembly:
6. Pre-heat the
oven to 350 degrees.
7. Line the bottom
of a 9x9 baking pan with tin foil and then spray the tin foil with a layer of
baking spray.
8. Layer the
cookie dough on the bottom of a 9x9 baking pan, pressing down to form the
bottom of the slutty brownies.
9. Layer as many
oreos that will fit on top of the cookie dough. No need to overlap. One single
layer will do.
10. Pour the
brownie batter on top of the oreo layer and make sure it's evenly layers on
top.
11. Bake for 30-35
minutes. Test with a knife to see if the center is done. If the knife comes out
clean, let the brownies rest before serving. If the knife comes out with batter
still on it, allow the brownies to bake about 5 minutes more.
12. Serve with ice
cream :) From What’s Gaby Cooking
That's it for me! I hope next time we visit it'll be warmer out! I still can't imagine sitting out on my deck but I know one of these days we'll wake up and it'll be fantastic weather and these past few months of being in the deep freeze will be just a memory...
No comments:
Post a Comment